In this blog post I’ll try to outline what you’ll need to know about planning a full bicycle tour of the JWPT in a shorter more user friendly post with all the info I currently have. The route is explained pretty good day to day in my previous posts so make sure you read them as well. They are linked at the bottom of this post.
The trail is 300 miles long including the reroutes (give or take 10 or so). I’d plan on at least 5 days if you ride in late fall like we did. We had originally planned on 6 days and I think 7 would be more than enough. The best time to ride the trail is going to be in April or Late September/early October. Riding 60 miles a day requires about 8-10 hrs at a leisurely pace. The sun doesn’t come up until almost 7 and sets by 6 in October.
Things you’ll want to get ready early:
- Permits: You need 2 two permits. One for the DNR owned section from Beverly to Lind and one from State Parks from Lind to Tekoa. The entire west side 110miles to the Columbia does not require a permit. You can date them for up to a year even if you’ll be on the trail for one day. There is no fee.
- Contact Mike Williams at the DNR for your DNR permits from Beverly to Lind. In this permit pack he’ll send you four maps that have the officially recognized reroutes on them and the code to the couple of locked gates. All you do is fill it out, take a pic to email back to him and you’re done. No cost.
Mike Williams/DNR
Recreation Specialist
SE Region Department of Natural Resources (DNR)
W: 509.925.0973
C: 509.856.6579
michael.williams@dnr.wa.gov
- Contact Clara at Parks for the second set of permits: She will also send out gate codes and an easy to fill out form.
Clara Dickinson-McQuary
Program Specialist 2
Blue Mountain Area
Main: (509) 337-6457
cell: (509) 386-0876
clara.dickinson-mcquary@parks.wa.gov
Next you’ll want to gather all the maps you can get. You can start by printing the maps from the State Parks website for the Iron Horse section here. It’s the first 110 miles on the west end of the Columbia. Click on the Maps and you can download 2 maps from my Google Drive and zoom in or print as well. These two maps have trailheads,bathrooms and camping listed.

Iron Horse State Park West Map 1 of 2

Iron Horse State Park East Map 2 of 2
Here are the 4 maps that they will send you when you get permits. The best ones were the HQ ones from the DNR. Click on the images below to link to them on my Google Drive. From there you can zoom in or print also.
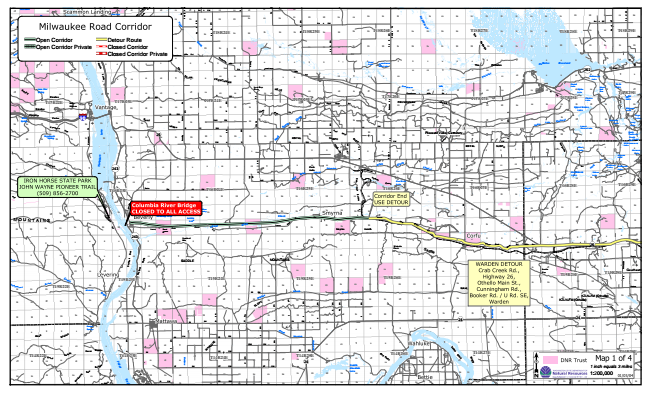
JWPT East Map 1
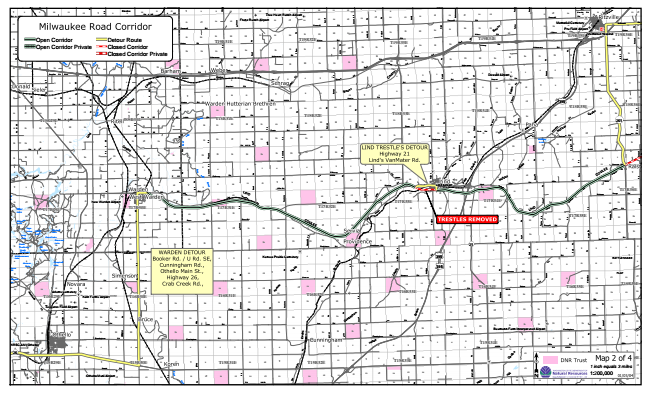
JWPT East Map 2
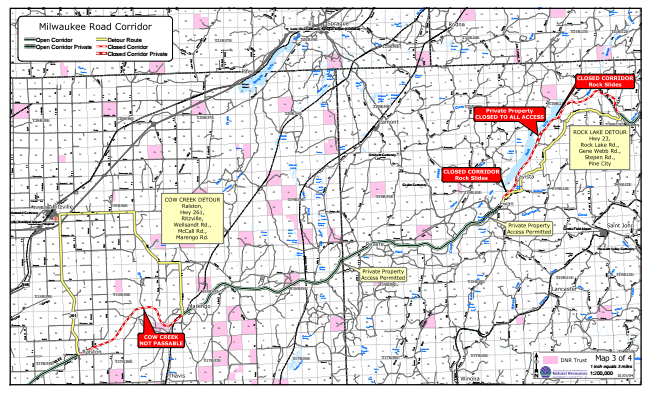
JWPT East Map 3
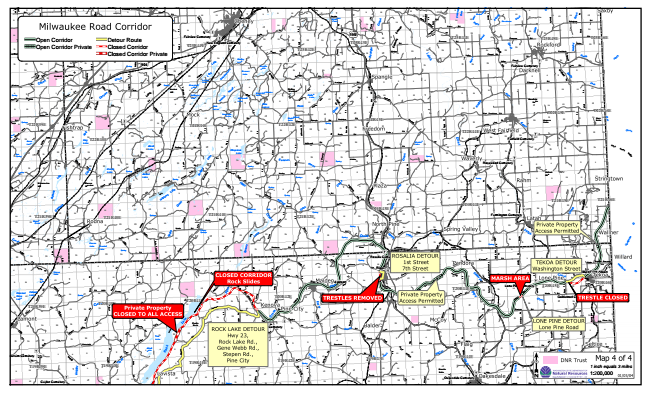
JWPT East Map 4
Now that you have these 6 maps you can supplement them with a a bunch of other maps and blog posts:
- A great new site is “Friends of The John Wayne Pioneer Trail” found here
- Pat Sprute’s blog was a huge factor for us in planning. We had to read it backwards but we got the main gist if things. You can get a gpx file from this page and read about his entire trip from East to West. Thanks Pat for your blog inspiration and countless questions in emails 🙂
- Randy Pulk’s blog here covers a second perspective as he was my great partner on this trip.
- Trail Link by Rails to Trails has lots of great reviews of the trail. One I found most helpful was by “rustblue2” about 5 reviews down as of September. Scroll to the bottom of the page and view it here.
- Washington State Gazetteer. I have the Delorme one and it was great for planning. You can follow the trail in great detail all the way from one end to another. The best part about it is you can scan up and down quickly for points of interest north and south of the trail. You can copy it and print too for more portable paper maps. I would’ve just taken a good HQ pic on my camera phone that I could pull up and zoom in later.
- Delorme Inreach GPS/Satellite navigator. I took one and it was awesome for allowing people back home to follow along by watching our progress each day. You just turn it on each day and they can follow your path on the map. You can also text 2 way with them which was handy when out of cell range.
- Google Maps was another strong tool. We were able to select satellite view, zoom all the way into just a few feet over the trail and fly over the entire route. I highly suggest you do this before you leave.
Reroutes: These were tricky but only because we didn’t pay close enough attention to detail. There are only a couple of reroutes in the western half and 7 on the east side. All of the East side ones are on the 4 DNR maps.
West Side:
- The first reroute is just east of Kittatas. You’ll come to a posted sign on the trail just before you cross over I90. Follow this reroute as there is no easy other way OVER I90. You head east on Boylson rd that parallels I 90 and come out just below the start of the Yakima Taining Center section.
- Boylston Tunnel has a recommended detour but we found it be quite clear and safe
- Beverly bridge/I90 Vantage Bridge. This one is tricky. See my notes in the blog post for Day 2.
- Remember the Snoqualmie Tunnel is closed Nov 1st to May 1st. There is an option to ride over old Denny Creek Hwy to the other side of the ski area. It’s passable most of the year…and in snow via a fatbike. I’ve used that as a training route before 🙂 You will not be able to ride the trail in the winter though due to some of the trail by Hyak being groomed for skis.
East Side:
- Warden Detour. This detour starts in the area of “Smyrna”. You’ll get to Smyrna and have to stop and pull goat heads out right there in town. You’ll come to a cross steet (H SW) where you turn right a block and get on Rd 17SW ( I swear it was signed Crab Creek Rd at this point too) and head east to Crab Creek Rd. It’s about a mile or two. The road will head straight north. Do not go that way. Continue east along Rd 17SW all the way until you get to Hwy 26 (it turns into Gillis towards the end but just continue straight east). From here you get on Hwy 26 and work your way up to Othello. It’s up to you how you get through town depending on what services you need. You then head straight north up to Warden. There are two ways to get there. One is on the “onion rd” that we took (Cunningham-Booker-U rd) or you can research Pat’s detour which lead him along the canal that runs north. You can read about that here.
- Lind Detour. This was a very short detour which is easy to find. Once you hit blacktop just outside of town and in view of the old trestle, you just hit the road and head east. You can get pretty close to trestle to take pics if you’d like.
- Cow Creek Detour. This detour is the trickiest. I’d probably just suggest to follow the posted route that is posted once you hit Ralston. There you can refuel with water anyway but no services until you hit Ritzville up north. We opted for a south detour but were not successful. Feel free to message me about the details and I’d be happy to share. You can read about it on Day 4.
- Rock Lake Detour. Here is a detour that we followed the posted route but heard later on that the entire section of trail along the lake IS passable and no one will trouble you as a biker. Just remember to leave no trace and stay on the trail. If you do end up following the posted route you will have a pretty ride. It passes through some very cool hilly farm land and is neat in it’s own right.
- Rosalia Detour: This one was super short and sweet. You just head into town and it’s a quick detour back up to the trail.
- lone Pine Detour: This is the “marsh” one that we neglected to follow. The schrub get’s over your head and if you try to get out of the trail by bushwacking, you end up to your knees in mud. Ask me how I know…..Make sure you get around this and back on the trail asap so you can see more trail heading into Tekoa.
- Tekoa Detour: We missed this one as well as we stayed on the gravel road into town after our 77 mile day frozen into Popsicle sticks. There is a trestle you have to detour near town.
Camping: Camping is tricky also. There is a bunch on the west side with toilets and pads for your tent. You can see them on the 2 Iron Horse maps I linked above.
Once you hit the east side you have to camp ON the trail. Please remember to leave NO trace. Here are some spots that we noticed though:
- Vantage: There is a campground near Vantage along the Columbia river. You can resupply on water and food there. Especially handy if you camp there and leave early to hit the bridge traffic just right getting over the bridge.
- Beverly: There is also some camping about 4 miles east of Beverly in the Lower Crab Creek area, one being the parking lot for Lenice Lake and has a toilet. We camped on the trail setting up camp about 2 miles from here…would’ve been nice to know this haha.
- I’m honestly not aware of any other official camping spots with toilets along the rest of the trail from here east. You have to camp on the trail. We got out of towns about a mile or so and just set up camp. We never saw anyone on the trail the entire time. You maybe able to book a hotel in Othello but I’m not sure. That will be it though…it’s baren the rest of the way.
- To note though,we camped Near Beverly, just outside of Warden and then Marengo all on the trail.
Water: Water wasn’t an issue for us but we did it in the cooler time of the year. Each day I still went through nearly 120 oz of water so plan on carrying two days of water once you cross the Columbia. Here are some areas that had water or where you could ask for it if you knocked on a door in town.
- Hyak (restroms for trailhead), Easton, Cle Elum, Thorp (gas station), Ellensburg, Kittitas, Vantage
- East side get’s trickier. Beverly (gas station), Othello (full service), Warden (gas station), Lind (full service), Ralston (water at the memorial park), Ewan (seemed like a very friendly town where you could knock on a door), Pine City (from the grain silo there along the road in town if you ask), Rosalia (might have to do some door knocking again), Tekoa.
- The other option is to filter but I’d be very careful what you filter from. Some of that water has to be contaminated from agricultural runoff.
Detailed blog posts can be found from the links below. I hope you enjoy reading them!
Day 1: Rattlesnake Lake to Cle Elum
Day 2: Cle Elum to Columbia River
Day 3: Columbia River (Beverly) to Warden
Day 4: Warden to Marengo
Day 5: Marengo to Tekoa
Also, here is some fantastic drone footage and short video our friend Chris shot while on parts of this trip for us!